Sometimes it happens that you need to enlarge your LVM partition of your Ubuntu linux installation.
Therefore following the next steps should help you to get rid of your problem in most cases.
Important note: Manipulation of partition can lead to errors in your operating system. Please use the below tutorial only if you are confident following it and you have a backup of your files in case something goes wrong. Incorrectly partitioning of your hard drive may result in loss of data or other unforeseen problems.

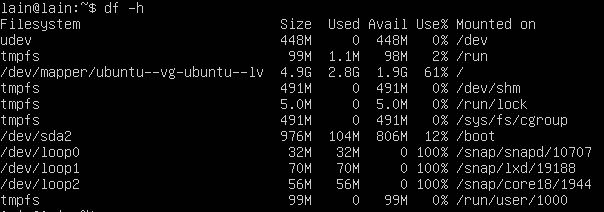
We initially can check the situation of our system with the dh code as used bellow:
$ dh -h

We can see above that the LVM partition is 4.9 GB in size. With the bellow command we can see we have available 10 GB of total storage.
$ sudo fdisk -l

We can see that there should be roughly 5 GB of available disk space that we can use to enlarge the LVM partition.
We use now the tool “parted” to make the resize.
$ sudo parted
The print command will give us some additional data.
$ resizepart

When you are done with resizepart you can exit with the command “quit”.
At this point we can finalize the resize by using the pvresize option. With the bellow command we issue the resize:
$ sudo pvresize /dev/sda3

The first try is showing an unsuccessful try because there was not enough space. Therefore we try again.
The 2nd try succeded.
$ sudo lvextend –size 8.9G /dev/mapper/ubuntu-vg-ubuntu–lv

I finished up this procedure with the bellow command, as a result disk was showing the full available capacity.
$ sudo resize2fs /dev/mapper/ubuntu—vg-ubuntu–lv


In conclusion we have now a bigger system to work with.
You can find more of Ubuntu tutorials on the link: https://wtp-web.com/blog/
If you have any suggestions on how to improve this article we are always happy to receive your feedback on our e-mail feedback@wtp-web.com. Thank you for reading and happy computing!
