
Installing NGINX a web server can be a challenging task. There are many components needed and settings to attend to, depending on what you want you want to use the server for.
For this tutorial we will be setting up Ubuntu within a Virtual Machine. Most of the steps would be same if we would install Ubuntu on a computer directly.
The main difference would be that we need to copy Ubuntu to an USB drive for the installation – in that case we would use the Rufus app from the site https://rufus.ie – a tutorial how to use rufus is our of the scope of this blog post.
I like to connect to the virtual machine using SSH which provides a secure tunnel to my virtual machine. For this instance, I’m using VirtualBox from Oracle. The network connection in the VirtualBox is bridged so the VM can access the network etc.
One important and often overlooked detail is how you can “copy” text in the terminal. This took me a while to figure out 🙂 – the way to copy text, commands etc. in the terminal is with right clicking.
In the past I had problems installing the server correctly and so it would run nicely, so I decided to make a tutorial with all the steps necessary to make the server work with different websites.
For this project we will be setting up a NGINX server with PHP-FPM 7.4.
Nginx is a open source project that is used world wide. Its capable of loading different CMS systems or web shops as Magento 2, WordPress, Joomla etc.
For more about this release, please check its homepage.
We will be focusing on setting up the server for a Magento 2 installation, but it should basically work with most CMS.
In this tutorial you will learn:
- How to install and configure a Nginx, PHP, MariaDB, Varnish, SSL certificate
Prerequisites:
- A working Ubuntu server 20 system
- net-tools (can be installed with sudo apt install net-tools)
Step 1: Setup PHP 7.4-FPM with Nginx HTTP server
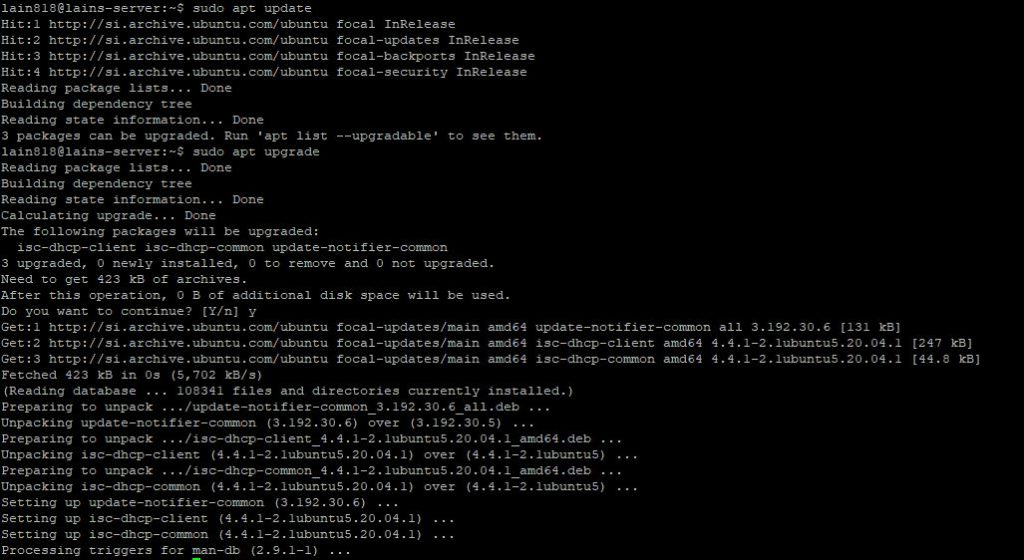
As with all dealings with linux distributions, it is always recommended to first update and upgrade the system.
sudo apt update
sudo apt upgrade
After the update we are ready to install Nginx. To use PHP 7.4-FPM with Nginx HTTP server, you should first install Nginx… To do that, run the commands below:
sudo apt install nginx
After installing Nginx, the commands below can be used to stop, start and enable Nginx service to always startup when the server boots up.
sudo systemctl stop nginx.service
sudo systemctl start nginx.service
sudo systemctl enable nginx.service
To check your current status of the Nginx server type:
sudo systemctl status nginx.service
If working correctly you will get a green active status response:

Step 2: Install PHP 7.4-FPM for Nginx
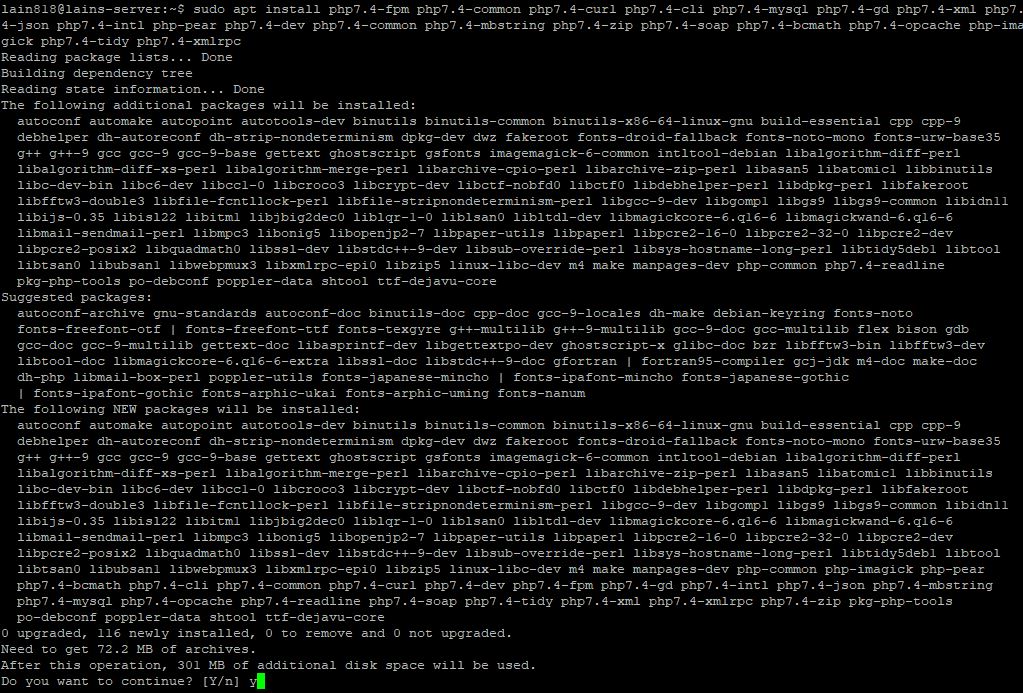
If your Nginx server is running ok then use the commands below to get PHP-FPM and related modules installed. There are many PHP-FPM modules that perform different functions… But this are mostly needed so Magento 2 works.
sudo apt install php7.4-fpm php7.4-common php7.4-curl php7.4-cli php7.4-mysql php7.4-gd php7.4-xml php7.4-json php7.4-intl php-pear php7.4-dev php7.4-common php7.4-mbstring php7.4-zip php7.4-soap php7.4-bcmath php7.4-opcache php7.4-imagick php7.4-recode php7.4-tidy php7.4-xmlrpc
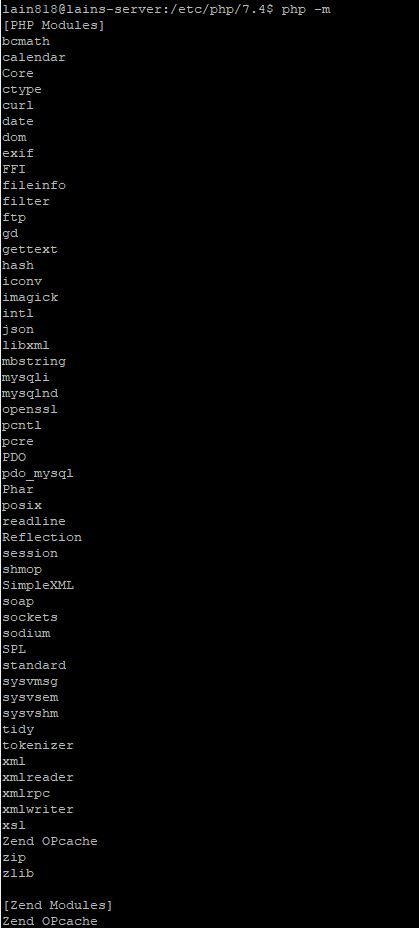
You can verify the installed modules with the command:
php -m
Step 3: Configure PHP 7.4-FPM for Nginx
Now that Nginx and PHP 7.4-FPM are installed, you need to configure Nginx to use PHP 7.4-FPM like intended. The default Nginx PHP-FPM configuration file should be located at /etc/php/7.4/fpm/php.ini
Open PHP configuration file by running the commands below and then edit the file accordingly.
sudo nano /etc/php/7.4/fpm/php.ini
Edit the file to suit your environment. Some important lines to consider are written below. You can use the search function with the shortcut CTRL + W.
file_uploads = On
allow_url_fopen = On
memory_limit = 512M
upload_max_filesize = 2000M
cgi.fix_pathinfo = 0
max_execution_time = 720
date.timezone = Europe/Ljubljana
zlib.output_compression = On
realpath_cache_size = 10M
realpath_cache_ttl = 7200
opcache.save_comments = 1
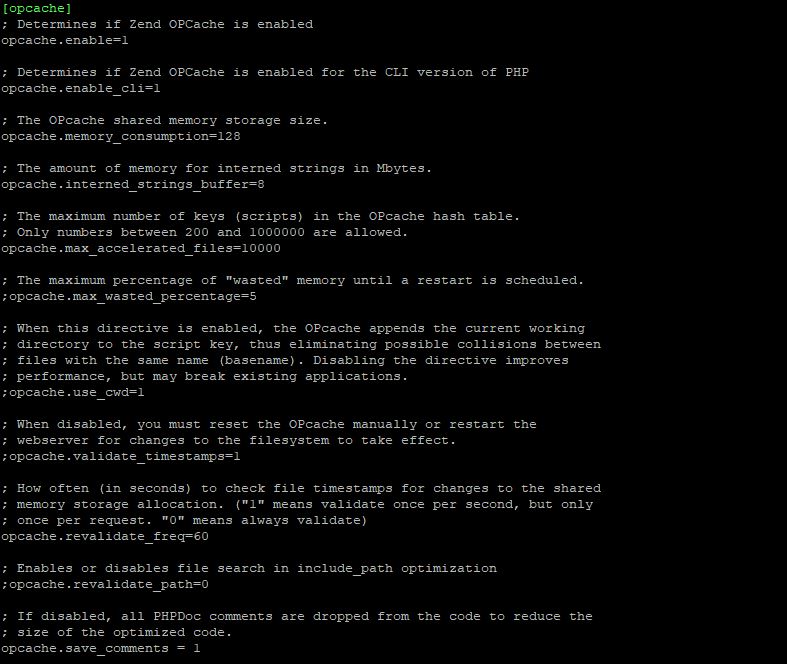
It is recommended also to tune bellow options in same files, specifically for Magento 2:
opcache.enable=1
opcache.enable_cli=1
opcache.memory_consumption=128
opcache.interned_strings_buffer=8
opcache.max_accelerated_files=4000
opcache.revalidate_freq=60
Save the file with the shortcut CTRL + S and confirm with Y.
sudo nano /etc/php/7.4/cli/php.ini
Just in case we can input the code bellow so every time the server reboots, the system gets back on its feet automatically.
sudo systemctl enable nginx.service
sudo systemctl enable php7.4-fpm
You should also stop and start the service with bellow commands, so the changes in the files become live.
sudo systemctl stop nginx.service
sudo systemctl stop php7.4-fpm
sudo systemctl start nginx.service
sudo systemctl start php7.4-fpm
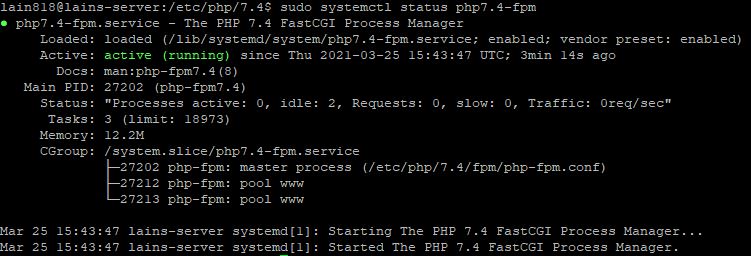
Just to double check our progress we can check the PHP service status:
sudo systemctl status php7.4-fpm
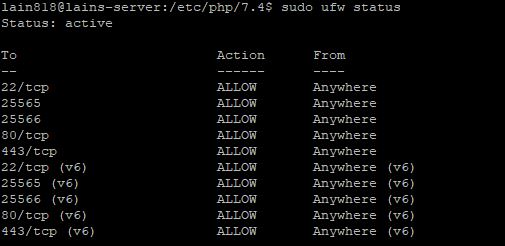
Step 4: Enable firewall and allow connections
We should also enable UFW and add exceptions, so you are able to access your server from the internet by typing the bellow code:
sudo ufw enable
Also, we can allow http and https with:
sudo ufw allow http
sudo ufw allow https
Check firewall status by typing:
sudo ufw status
Step 5: Testing our progress
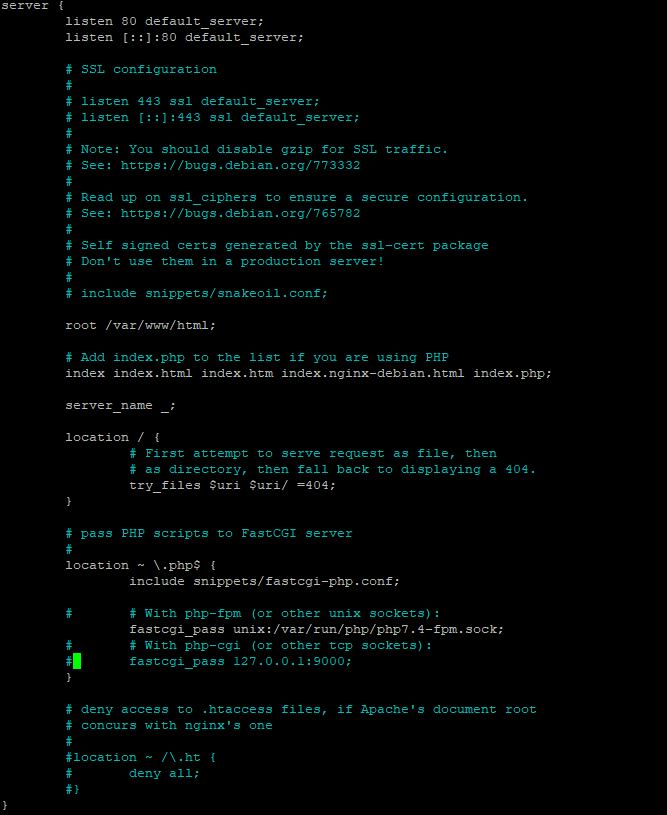
There is one more file we need to edit before going forward. That is:
sudo nano /etc/nginx/sites-available/default
Change the “index” part:
index index.html index.htm index.nginx-debian.html index.php;
And uncomment the function location ~ \.php$ {}
After all files are edited and saved, reset both NGINX and PHP.
sudo systemctl restart nginx.service
sudo systemctl restart php7.4-fpm
At this point Nginx with PHP-FPM should be installed and ready to use. We can double check if the system work by making a blank php file and putting in it the bellow code:
sudo nano /var/www/html/phpinfo.php
In the file we paste the bellow code:
<?php
phpinfo();
?>

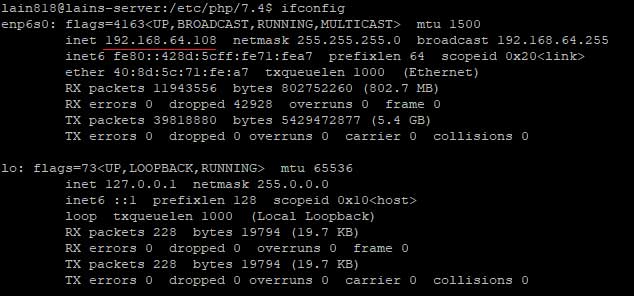
We save the file and follow our IP which can be found by typing:
ifconfig
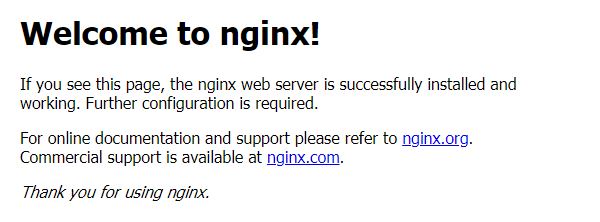
Now use your browser to access your server. If you type only your IP address, the NGINX logo should pop up:
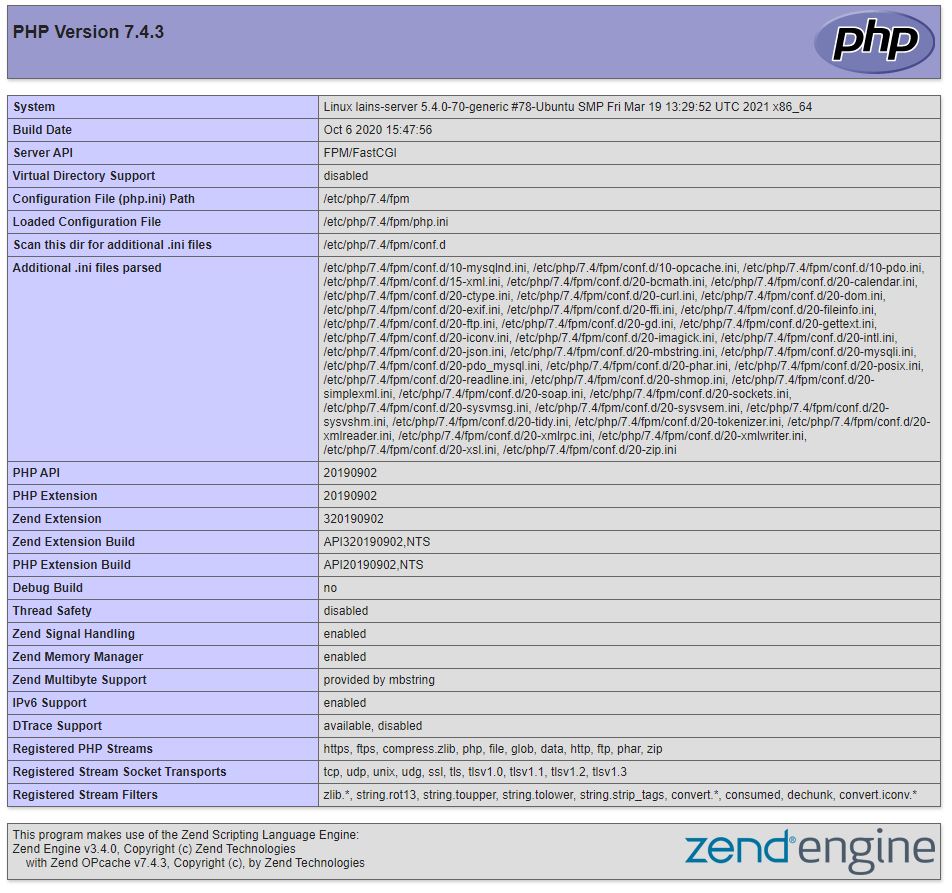
If you follow the IP and add “phpinfo.php” on the end you should see something similar to the bellow image:
Example:
http://192.168.64.108/phpinfo.php
Step 6: Setting up MariaDB
For our project we will choose to install MariaDB server, but many other distributions could be used instead of our choice. We will be setting up root password and create a database for Magento to use.
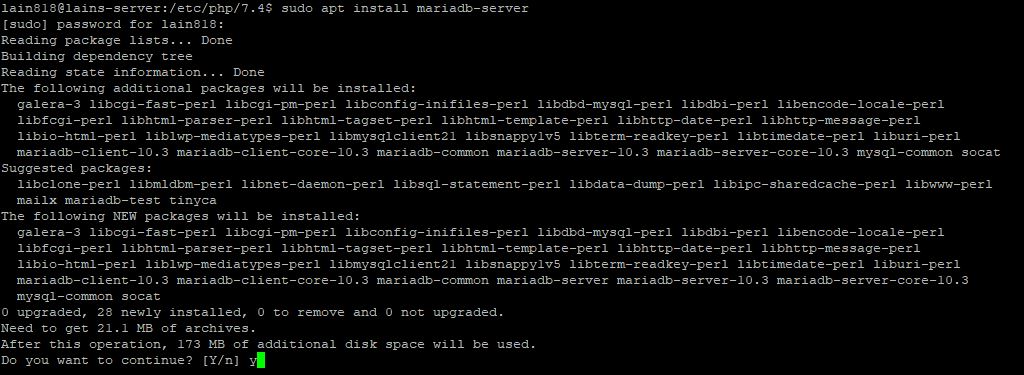
sudo apt install mariadb-server
After the installation completes we should start the server and enable the services.
sudo systemctl start mariadb
sudo systemctl enable mariadb
Sometimes we need to be able to stop or check the status of the MariaDB server service – we can use bellow command in the terminal:
sudo systemctl stop mariadb
sudo systemctl status mariadb
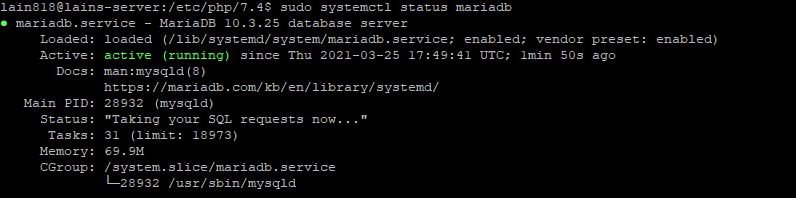
We can see that MariaDB is up and running. Next we should set up MariaDB configurations.
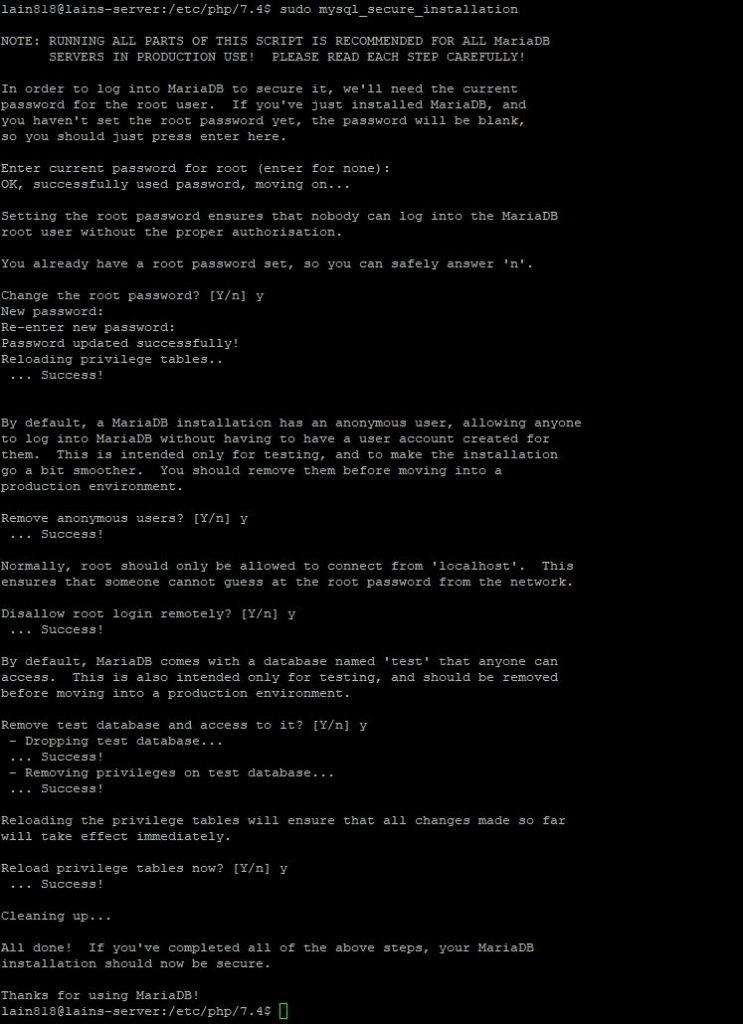
We run the installation with the command bellow:
sudo mysql_secure_installation
Type and safe a strong password you can use in MariaDB as a root user and type Y for all other configurations.
Set a root password? [Y/n] Y
Remove anonymous users? [Y/n] Y
Disallow root login remotely? [Y/n] Y
Remove test database and access to it? [Y/n] Y
Reload privilege tables now? [Y/n] Y
We are now able to create databases – let`s make one for Magento.
Log in to your MariaDB server by using the bellow command:
sudo mysql -u root -p
Now are are able to create a new database for our Magento installation. Crete the DB with an user and password:
Run the MySQL queries:
create database magDBtest;
create user magentouser@'localhost' identified by 'dbpass';
grant all privileges on magDBtest.* to magentouser@'localhost';
flush privileges;
After you are done type “exit” and press enter. You will be returned to your terminal window.

Now we have a working database to install Magento to.
Step 7: Installing Composer
Composer is a dependency manager for PHP. it’s an application-level package manager for PHP that allows you to download additional PHP dependencies and libraries to your PHP project.
We will install Composer PHP in Ubuntu. You can use the below code in the terminal:
sudo apt install composer
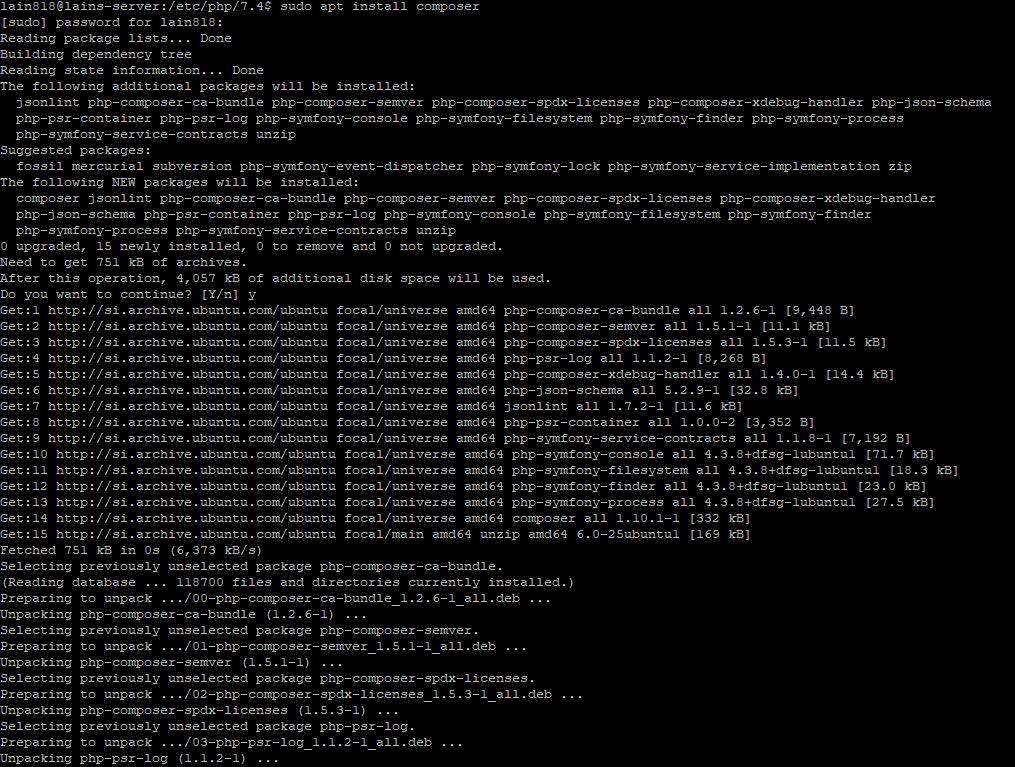
When the installation is finished we can double check the version by typing:
composer –version
You should get a response similar to the bellow image:

The version we got is 1.10.1, dated 2020-03-13.
Step 8: Download and install Magento 2
We are finally ready to download and install Magento 2. All needed PHP packages will be fetched by Composer.
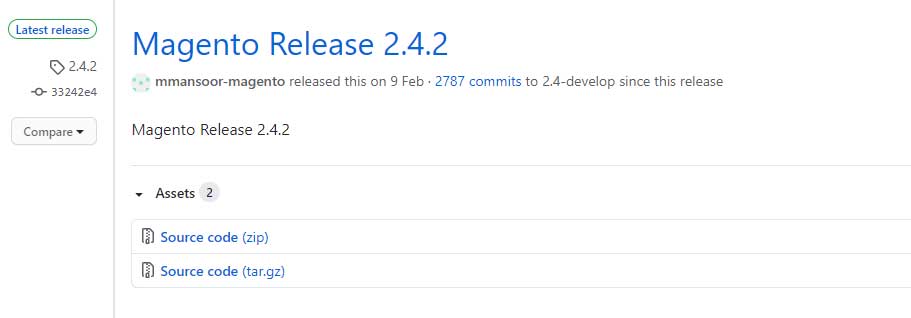
You can double check GitHubs magento2 repository for the latest release. In our example the current release is 2.4.2. You can copy the link by right clicking on the “tar.gz” file and choosing copy the URL address.
Switch to the directory as shown bellow and then run the wget command with the link (double check the version):
cd /var/www
sudo wget -q https://github.com/magento/magento2/archive/refs/tags/2.4.2.tar.gz
When the download completes you can move the file to a folder we will be creating and extract it to get the source code.
sudo tar -xf 2.4.2.tar.gz
sudo mv magento2-*/ magento2test/
If needed we can delete the tar.gz file with the command:
sudo rm 2.4.2.tar.gz
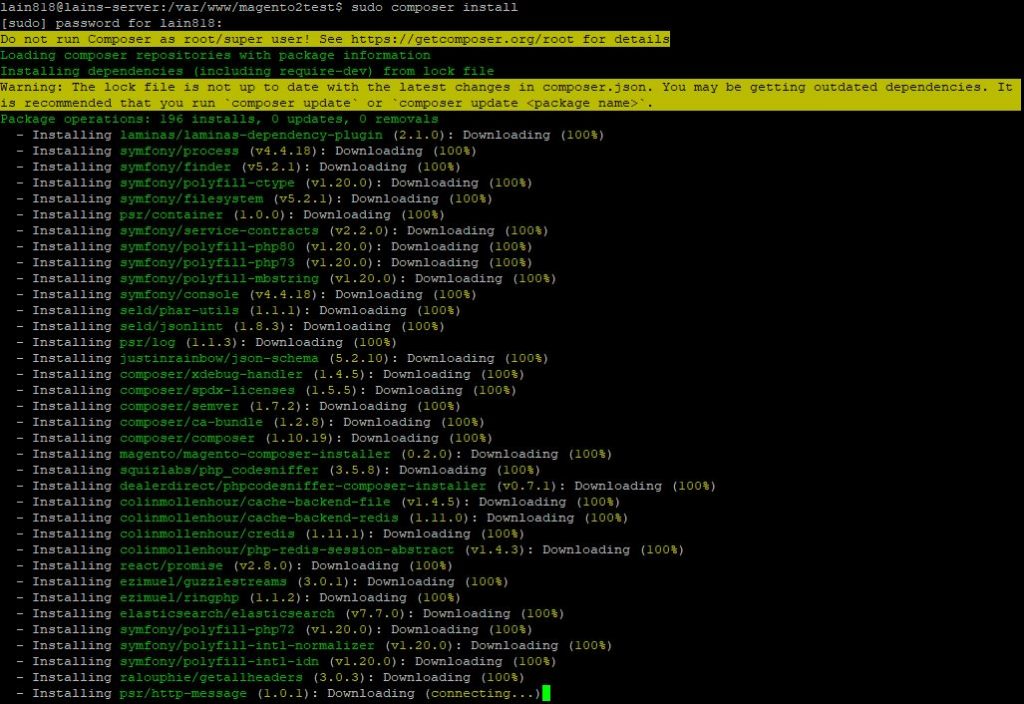
We can now switch to the new folder and install PHP packages dependencies for Magento 2 using the Composer:
cd magento2test
sudo composer install
We can run the update process for the dependencies in Magento 2:
sudo composer update
When the installation process is done, you need to fix the ownership of the Magento2 installation directory to the user “www-data” and your username:
sudo chown -R lain818:www-data /var/www/magento2test/
Now we should have a fresh and updated copy of the Magento2 source files with all needed dependencies.
Step 9: Generating SSL Let`s Encrypt certificate
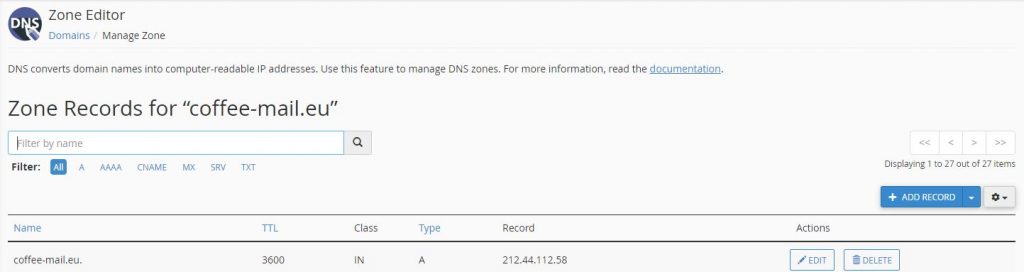
For this step you will be needing a domain pointed to your server. Setting up that part is out of the scope of the current tutorial as it depends on the registrar website and/or your modem-router brand, but it shouldn’t be too difficult.
Basically, you need to log in to your domain registrar and route your “type A” to your public IP address.
In our CPanel access zone it looks something like the bellow image:
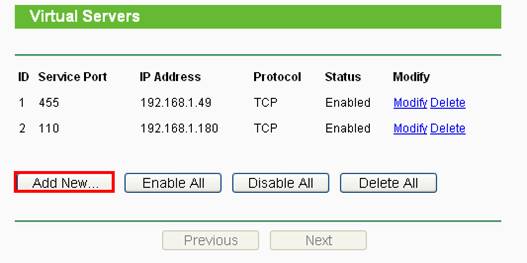
Also, you need your router/modem to have port forwarding set up for ports 80 and 443 to route to your local IP address – in our example it was 192.168.64.108 (shown in step 4).
The bellow example is from a TP-Link router from this web link:
https://www.tp-link.com/us/support/faq/72/
If we satisfy the above requirements, we can install SSL Letsencrypt and generate a SSL certificate.
sudo apt install certbot
Once this step is completed, we need to stop the NGINX service.
sudo systemctl stop nginx
Now we need to issue the bellow command, but you need to change the e-mail address and web address to correspond your data and domain name:
sudo certbot certonly --standalone --agree-tos --no-eff-email --email [email protected] -d coffee-mail.eu
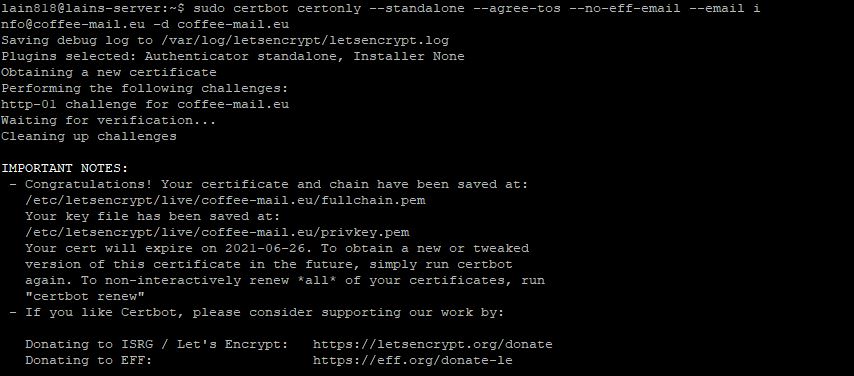
We can see that after the process is complete your SSL certificate is stored in the directory:
“/etc/letsencrypt/live/coffee-mail.eu/”
At this point we will generate the dhparam.
openssl dhparam -out /etc/nginx/ssl/dhparam.pem 2048
We can now go to the next step as the SSL certificate was successfully generated.
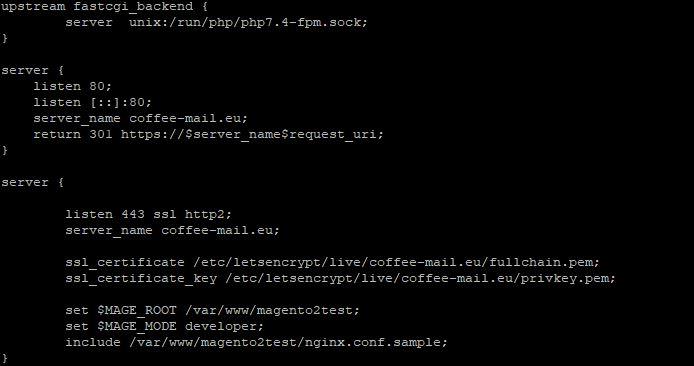
Step 10: Setting up NGINX Virtualhost to work with Magento 2
Let`s add a new NGINX virtual configuration file.
Switch to the directory “sites-available” and create a new configuration file for our test magento store.
cd /etc/nginx/sites-available/
sudo nano magento2test
In the file paste the following configuration details and save the file after. Be sure to change our test coffee-mail.eu domain with your domain name.
upstream fastcgi_backend {
        server  unix:/run/php/php7.4-fpm.sock;
}

server {
    listen 80;
    listen [::]:80;
    server_name coffee-mail.eu;
    return 301 https://$server_name$request_uri;
}

server {

        listen 443 ssl http2;
        server_name coffee-mail.eu;

        ssl_certificate /etc/letsencrypt/live/coffee-mail.eu/fullchain.pem;
        ssl_certificate_key /etc/letsencrypt/live/coffee-mail.eu/privkey.pem;

        set $MAGE_ROOT /var/www/magento2test;
        set $MAGE_MODE developer;
        include /var/www/magento2test/nginx.conf.sample;
}
Now we need to activate the NGINX Virtualhost and test if the configuration file is written up correctly and has no errors.
sudo ln -s /etc/nginx/sites-available/magento /etc/nginx/sites-enabled/
sudo nginx -t

Now let`s restart the Nginx service using the following command.
sudo systemctl restart nginx
Now the NGINX virtual host configuration for test Magento 2 has been created and enabled.
Step 11: Installing and Configuring Elasticsearch for our Ubuntu system
The Elasticsearch components are not available in Ubuntu’s default package repositories. They can, however, be installed with APT after adding Elastic’s package source list.
All of the packages are signed with the Elasticsearch signing key in order to protect your system from package spoofing. Packages which have been authenticated using the key will be considered trusted by your package manager. In this step, you will import the Elasticsearch public GPG key and add the Elastic package source list in order to install Elasticsearch.
To begin, use cURL, the command line tool for transferring data with URLs, to import the Elasticsearch public GPG key into APT. Note that we are using the arguments -fsSL to silence all progress and possible errors (except for a server failure) and to allow cURL to make a request on a new location if redirected. Pipe the output of the cURL command into the apt-key program, which adds the public GPG key to APT.
We will start with importing Elasticsearch public:
curl -fsSL https://artifacts.elastic.co/GPG-KEY-elasticsearch | sudo apt-key add –

Next, we will be adding the Elastic source list to the sources.list.d directory, where APT will search for new sources:
sudo echo "deb https://artifacts.elastic.co/packages/7.x/apt stable main" | sudo tee -a /etc/apt/sources.list.d/elastic-7.x.list

Next, we will be updating our package lists so APT will read the new Elastic source:
sudo apt update
Now we can install Elasticsearch with the bellow command input in the terminal:
sudo apt install elasticsearch
Elasticsearch is now installed and ready to be configured on our ubuntu system.
Step 12: Lets configure Elasticsearch
To configure Elasticsearch, we will edit its main configuration file elasticsearch.yml where most of its configuration options are stored. This file is located in the /etc/elasticsearch directory.
Use your preferred text editor to edit Elasticsearch’s configuration file. Here, we’ll use nano:
sudo nano /etc/elasticsearch/elasticsearch.yml
Note: Elasticsearch’s configuration file is in YAML format, which means that we need to maintain the indentation format. Be sure that you do not add any extra spaces as you edit this file.
The elasticsearch.yml file provides configuration options for your cluster, node, paths, memory, network, discovery, and gateway. Most of these options are preconfigured in the file but you can change them according to your needs. For the purposes of our demonstration of a single-server configuration, we will only adjust the settings for the network host.
Elasticsearch listens for traffic from everywhere on port 9200. You will want to restrict outside access to your Elasticsearch instance to prevent outsiders from reading your data or shutting down your Elasticsearch cluster through its REST API. To restrict access and therefore increase security, find the line that specifies network.host, uncomment it, and replace its value with localhost so it reads like this:
Elasticsearch.yml file:
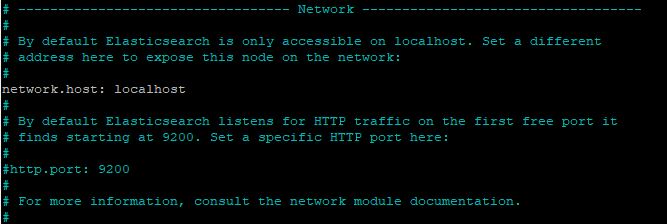
We have specified localhost so that Elasticsearch listens on all interfaces and bound IPs. If you want it to listen only on a specific interface, you can specify its IP in place of localhost. Save and close elasticsearch.yml. If you’re using nano, you can do so by pressing CTRL+X, followed by Y and then ENTER .
These are the minimum settings you can start with to use Elasticsearch. Now you can start Elasticsearch for the first time.
Start the Elasticsearch service with systemctl. Give Elasticsearch a few moments to start up. Otherwise, you may get errors about not being able to connect.
sudo systemctl start elasticsearch
Next, run the following command to enable Elasticsearch to start up every time your server boots:
sudo systemctl enable elasticsearch
By typing the bellow command we can see that the service is working:
sudo systemctl status elasticsearch
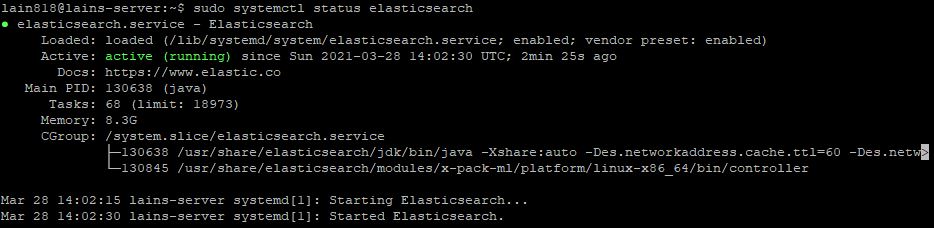
With Elasticsearch enabled upon startup, let’s move on to the next step to discuss security.
Step 13: Securing Elasticsearch
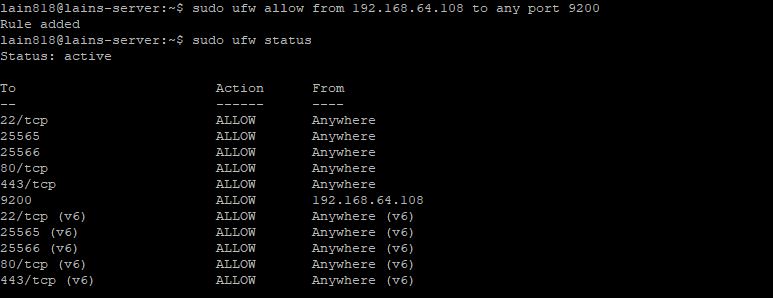
By default, Elasticsearch can be controlled by anyone who can access the HTTP API. This is not always a security risk because Elasticsearch listens only on the loopback interface (that is, 127.0.0.1), which can only be accessed locally. Thus, no public access is possible and as long as all server users are trusted, security may not be a major concern.
If you need to allow remote access to the HTTP API, you can limit the network exposure with Ubuntu’s default firewall, UFW. This firewall should already be enabled if you followed the steps in the prerequisite Initial Server Setup with Ubuntu 20.04 tutorial.
We will now configure the firewall to allow access to the default Elasticsearch HTTP API port (TCP 9200) for the trusted remote host, generally the server you are using in a single-server setup, such as 192.168.64.108. To allow access, type the following command which should resolve in a “Rule added” notice:
sudo ufw allow from 192.168.64.108 to any port 9200
Next we can double check the status of our Firewall to see if our IP wass added to the exception along with the 9200 port:
sudo ufw status
Step 14: Testing Elasticsearch
Now we can double check if Elasticsearch is running on port 9200. We can test this with cURL and a GET request.
curl -X GET 'http://localhost:9200'
You should receive the following response:
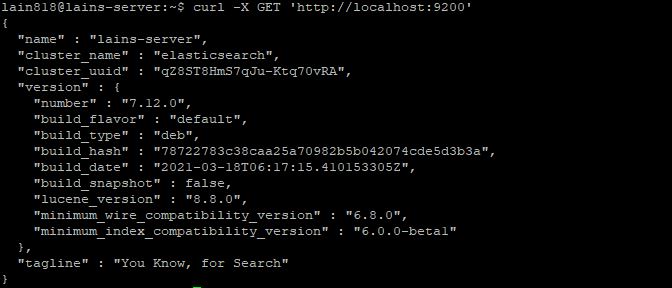
If you receive a response like the one above, Elasticsearch is working properly.
To perform a more thorough check of Elasticsearch execute the following command:
curl -XGET 'http://localhost:9200/_nodes?pretty'
In the output from the above command you can verify all the current settings for the node, cluster, application paths, modules, and more.
Step 15: Magento finishing up the installation
We are now ready to open the browser and type in your domain name in the address bar.
For us the address is: https://coffee-mail.eu
sudo php bin/magento setup:install
--base-url=http://coffee-mail.eu/ \
--base-url-secure=https://coffee-mail.eu/ \
--use-secure-admin=1 \
--db-host=localhost \
--db-name=magDBtest \
--db-user=magentouser \
--db-password=dbpass \
--admin-firstname=Magento \
--admin-lastname=User \
[email protected] \
--admin-user=admin \
--admin-password=admin123 \
--language=en_US \
--currency=EUR \
--timezone=Europe/Ljubljana \
--cleanup-database \
--session-save=db --use-rewrites=1 \
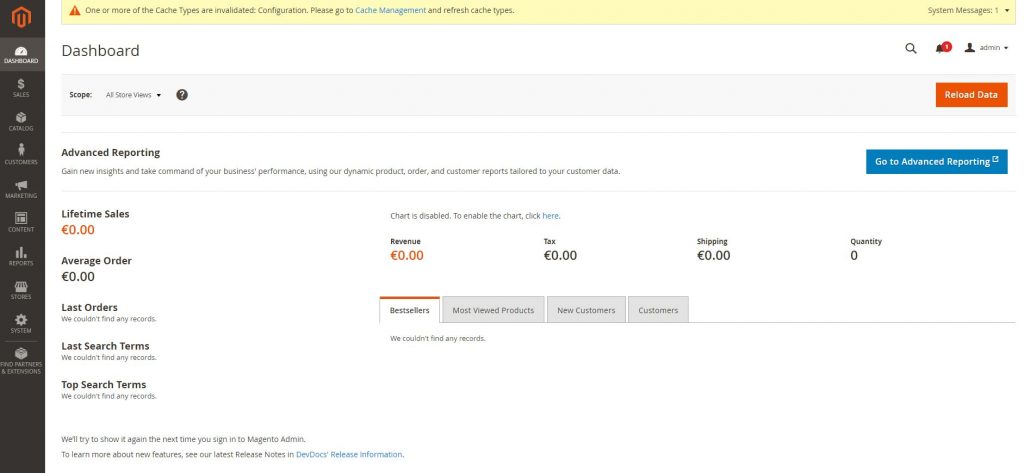
After the system finishes it should show output like bellow:

As suggested by the installation we should set up correct permissions of our folder of the Magento installation:
cd /var/www/html/<magento install directory>
sudo find var generated vendor pub/static pub/media app/etc -type f -exec chmod g+w {} +
sudo find var generated vendor pub/static pub/media app/etc -type d -exec chmod g+ws {} +
sudo chown -R www-data:www-data .
sudo chmod u+x bin/magento
At this point both front and back end should be accessible on your browser.
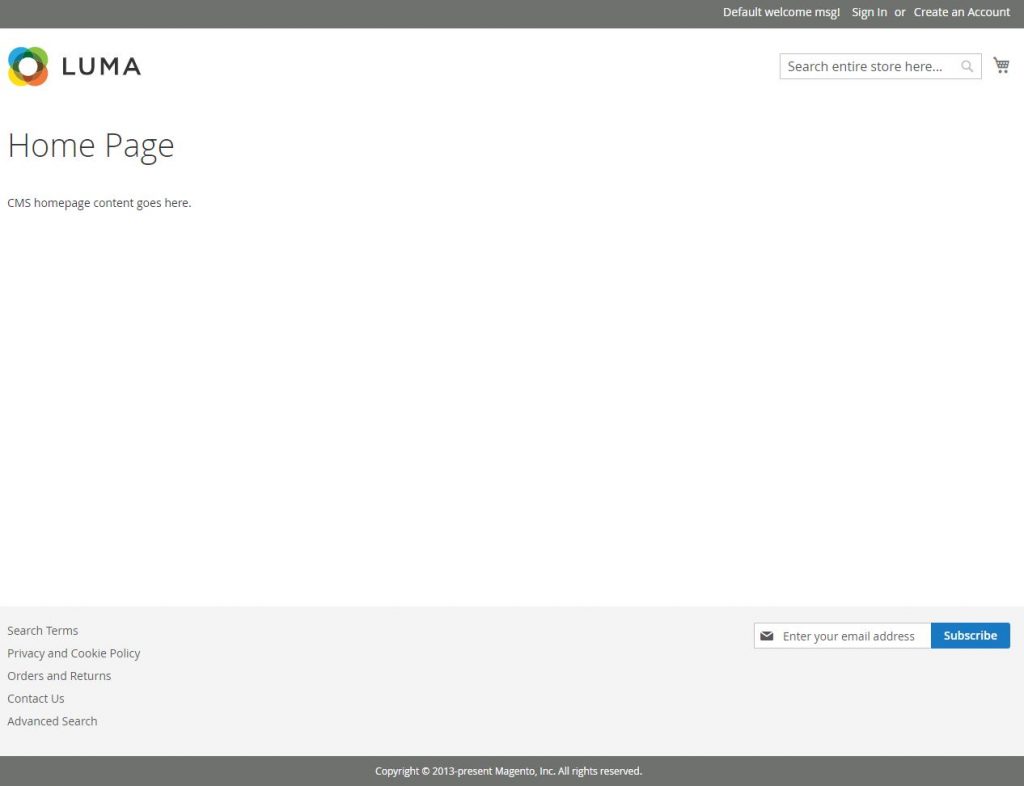
Accessing our domain trough the browser shows the blank Luma theme of Magento 2:
Showing the back end of Magento2 – we received the address on the end of the installations:
https://coffee-mail.eu/admin19r2oz
Step 16: Adding Magento sample data
At this point we will be trying to set up our Magento 2 installation to work with Varnish cache.
We start by ensuring we are in the developer mode:
sudo php bin/magento deploy:mode:set developer
We should get an output as “Enabled developer mode”.
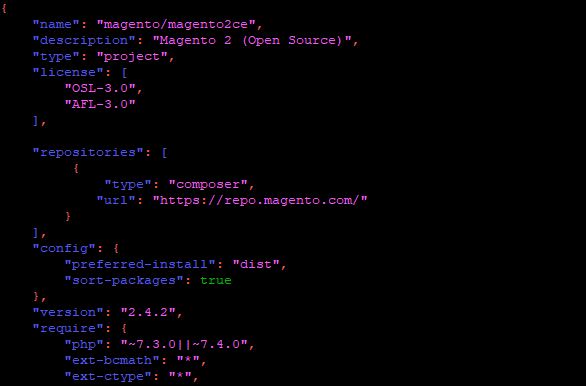
In our example we needed to add a few lines to the composer.json file in the Magento 2 installation folder using nano:
sudo nano composer.json
We add the bellow lines and save the file:
"repositories": [
         {
             "type": "composer",
            "url": "https://repo.magento.com/"
        }
    ],
Now we run the bellow command which will install sample data to our website:
sudo bin/magento sampledata:deploy
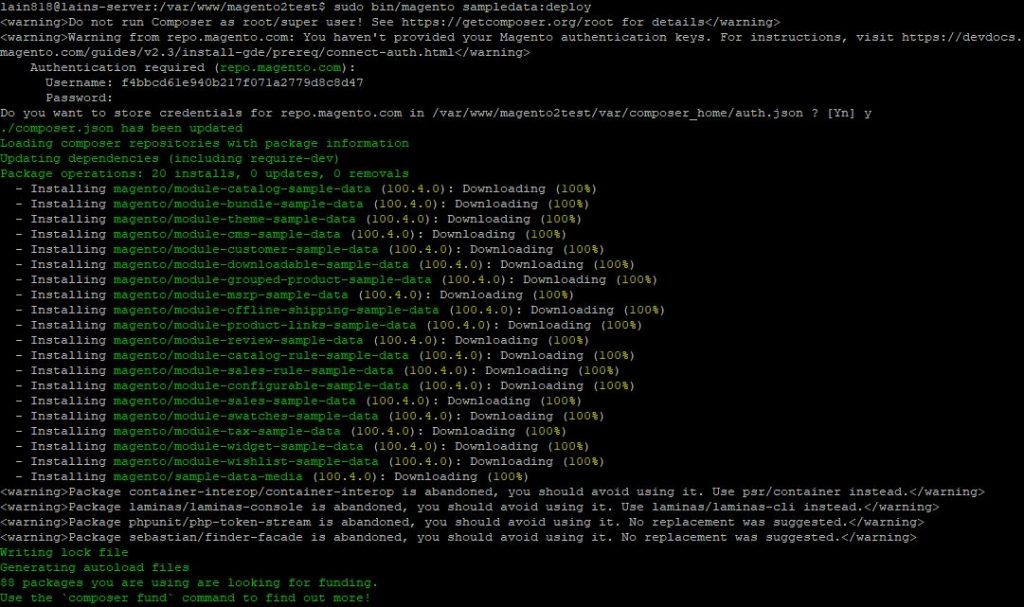
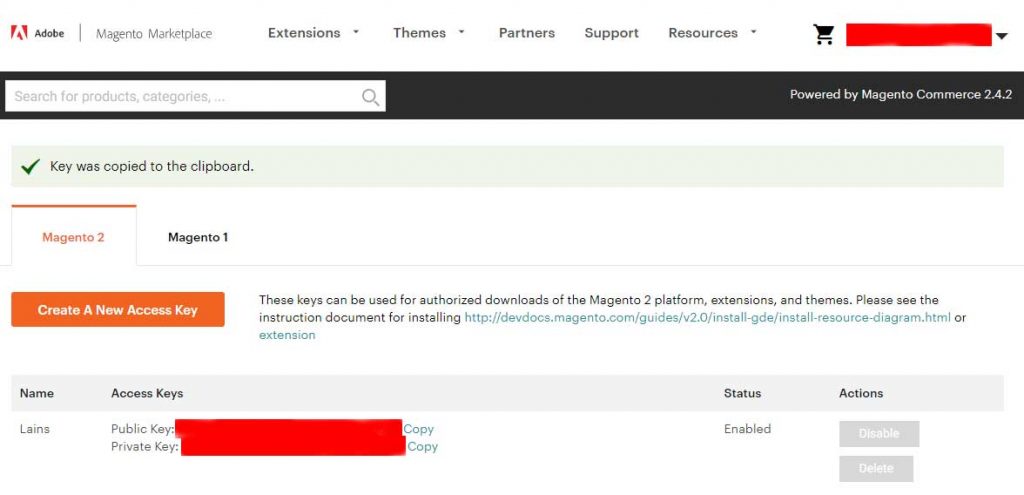
If the system ask you for user name and password you need to check those out in your Magento account on the marketplace.magento.com site:
At this point we need to upgrade our Magento system and clean and flush the cache:
sudo bin/magento setup:upgrade
sudo bin/magento cache:clean
sudo bin/magento cache:flush
Now when browsing our test Magento 2 installation you should be able to see products etc:

Step 17: Installing Varnish
Varnish Cache is a web application accelerator also known as a caching HTTP reverse proxy. You install it in front of any server that speaks HTTP and configure it to cache the contents. Varnish Cache is really, really fast. It typically speeds up delivery with a factor of 300 – 1000x, depending on your architecture. A high level overview of what Varnish does can be seen in this video.
Varnish performs really, really well. It is usually bound by the speed of the network, effectively turning performance into a non-issue. We’ve seen Varnish delivering 20 Gbps on regular off-the-shelf hardware.
Source: https://varnish-cache.org/
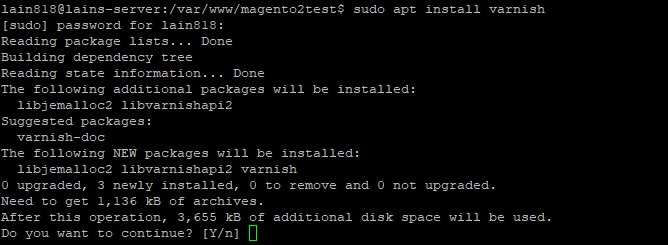
We start by installing varnish on our system:
sudo apt install varnish
We can double check the varnish version by using:
varnishd -V

At this point we are only left with configuring Varnish to work with correct ports and with Magento 2.
Step 18: Configuring Varnish for Magento 2
Varnish can be configured in different ways. We can use RAM or a file on the local disk. We will be using 8 GB RAM for this project.
First we will need to change the Magento 2 system to use Varnish instead of its standard cache system.
We can perform this action within the back end or with the terminal code written bellow:
sudo bin/magento config:set --scope=default --scope-code=0 system/full_page_cache/caching_application 2

We can do the same by visiting our backend and changing the configuration there.
Log in Magento back end and then browse to:
Stores > Settings > Configuration > Advanced > System > Full Page Cache.
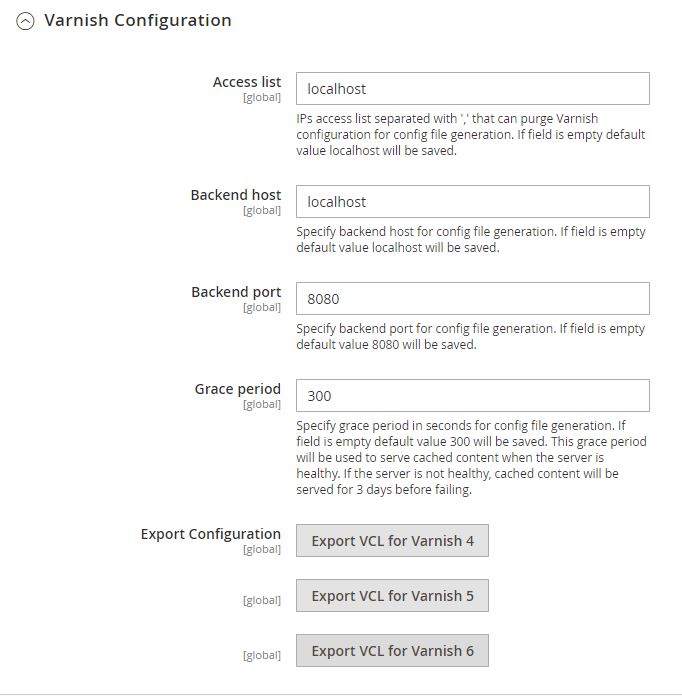
At this point we can also export the Magento 2 / Varnish configuration file – In our case Varnish 6:
Now we need to start working on the default.vcl file located in /etc/varnish. We will be making a backup from the original file:
File default.vcl.bak2:
sudo cp /etc/varnish/default.vcl /etc/varnish/default.vcl.bak2
At this point we need to copy the exported varnish.vcl file from Magento 2 to the Varnish folder.
We uploaded the varnish.vcl file by Filezilla with SSH connection, then we moved the file to the correct location:
sudo mv /home/lain818/varnish.vcl /etc/varnish/default.vcl
We can now edit the /etc/varnish/default.vcl file and add needed data – we will be pasting the whole file just to be sure:
sudo nano /etc/varnish/default.vcl
Then add the whole bellow text:
File default.vcl:
# VCL version 5.0 is not supported so it should be 4.0 even though actually used Varnish version is 6
vcl 4.0;
include "hit-miss.vcl";
import std;
# The minimal Varnish version is 6.0
# For SSL offloading, pass the following header in your proxy server or load balancer: 'X-Forwarded-Proto: https'
backend default {
    .host = "localhost";
    .port = "8080";
    .first_byte_timeout = 600s;
    .probe = {
        .url = "/health_check.php";
        .timeout = 2s;
        .interval = 5s;
        .window = 10;
        .threshold = 5;
   }
}
acl purge {
    "localhost";
}
sub vcl_recv {
    if (req.method == "PURGE") {
        if (client.ip !~ purge) {
            return (synth(405, "Method not allowed"));
        }
        # To use the X-Pool header for purging varnish during automated deployments, make sure the X-Pool header
        # has been added to the response in your backend server config. This is used, for example, by the
        # capistrano-magento2 gem for purging old content from varnish during it's deploy routine.
        if (!req.http.X-Magento-Tags-Pattern && !req.http.X-Pool) {
            return (synth(400, "X-Magento-Tags-Pattern or X-Pool header required"));
        }
        if (req.http.X-Magento-Tags-Pattern) {
          ban("obj.http.X-Magento-Tags ~ " + req.http.X-Magento-Tags-Pattern);
        }
        if (req.http.X-Pool) {
          ban("obj.http.X-Pool ~ " + req.http.X-Pool);
        }
        return (synth(200, "Purged"));
    }
# if (req.url ~ ".xml(.gz)?$") { return (pass); }
    if (req.method != "GET" &&
        req.method != "HEAD" &&
        req.method != "PUT" &&
        req.method != "POST" &&
        req.method != "TRACE" &&
        req.method != "OPTIONS" &&
        req.method != "DELETE") {
          /* Non-RFC2616 or CONNECT which is weird. */
          return (pipe);
    }
    # We only deal with GET and HEAD by default
    if (req.method != "GET" && req.method != "HEAD") {
        return (pass);
    }
    # Bypass shopping cart, checkout and search requests
    if (req.url ~ "/checkout" || req.url ~ "/catalogsearch") {
        return (pass);
    }
                if (req.url ~ "^/(sitemapsi/)/") {
                                return (pass);
                }
 if (req.http.host ~ "(www\.)?(web-wtp)\.com") {
     return(pass);
   }
    # Bypass health check requests
    if (req.url ~ "/health_check.php") {
        return (pass);
    }
    # Set initial grace period usage status
    set req.http.grace = "none";
    # normalize url in case of leading HTTP scheme and domain
    set req.url = regsub(req.url, "^http[s]?://", "");
    # collect all cookies
    std.collect(req.http.Cookie);
    # Compression filter. See https://www.varnish-cache.org/trac/wiki/FAQ/Compression
    if (req.http.Accept-Encoding) {
        if (req.url ~ "\.(jpg|jpeg|png|gif|gz|tgz|bz2|tbz|mp3|ogg|swf|flv)$") {
            # No point in compressing these
            unset req.http.Accept-Encoding;
        } elsif (req.http.Accept-Encoding ~ "gzip") {
            set req.http.Accept-Encoding = "gzip";
        } elsif (req.http.Accept-Encoding ~ "deflate" && req.http.user-agent !~ "MSIE") {
            set req.http.Accept-Encoding = "deflate";
        } else {
            # unknown algorithm
            unset req.http.Accept-Encoding;
        }
    }
    # Remove all marketing get parameters to minimize the cache objects
    if (req.url ~ "(\?|&)(gclid|cx|ie|cof|siteurl|zanpid|origin|fbclid|mc_[a-z]+|utm_[a-z]+|_bta_[a-z]+)=") {
        set req.url = regsuball(req.url, "(gclid|cx|ie|cof|siteurl|zanpid|origin|fbclid|mc_[a-z]+|utm_[a-z]+|_bta_[a-z]+)=[-_A-z0-9+()%.]+&?", "");
        set req.url = regsub(req.url, "[?|&]+$", "");
    }
    # Static files caching
    if (req.url ~ "^/(pub/)?(media|static)/") {
        # Static files should not be cached by default
        return (pass);
        # But if you use a few locales and don't use CDN you can enable caching static files by commenting previous line (#return (pass);) and uncommenting next 3 lines
        #unset req.http.Https;
        #unset req.http.X-Forwarded-Proto;
        #unset req.http.Cookie;
    }
    return (hash);
}
sub vcl_hash {
    if (req.http.cookie ~ "X-Magento-Vary=") {
        hash_data(regsub(req.http.cookie, "^.*?X-Magento-Vary=([^;]+);*.*$", "\1"));
    }
    # For multi site configurations to not cache each other's content
    if (req.http.host) {
        hash_data(req.http.host);
    } else {
        hash_data(server.ip);
    }
    # To make sure http users don't see ssl warning
    if (req.http.X-Forwarded-Proto) {
        hash_data(req.http.X-Forwarded-Proto);
    }
    if (req.url ~ "/graphql") {
        call process_graphql_headers;
    }
}
sub process_graphql_headers {
    if (req.http.Store) {
        hash_data(req.http.Store);
    }
    if (req.http.Content-Currency) {
        hash_data(req.http.Content-Currency);
    }
}
sub vcl_backend_response {
    set beresp.grace = 3d;
    if (beresp.http.content-type ~ "text") {
        set beresp.do_esi = true;
    }
    if (bereq.url ~ "\.js$" || beresp.http.content-type ~ "text") {
        set beresp.do_gzip = true;
    }
    if (beresp.http.X-Magento-Debug) {
        set beresp.http.X-Magento-Cache-Control = beresp.http.Cache-Control;
    }
    # cache only successfully responses and 404s
    if (beresp.status != 200 && beresp.status != 404) {
        set beresp.ttl = 0s;
        set beresp.uncacheable = true;
        return (deliver);
    } elsif (beresp.http.Cache-Control ~ "private") {
        set beresp.uncacheable = true;
        set beresp.ttl = 86400s;
        return (deliver);
    }
    # validate if we need to cache it and prevent from setting cookie
    if (beresp.ttl > 0s && (bereq.method == "GET" || bereq.method == "HEAD")) {
        unset beresp.http.set-cookie;
    }
   # If page is not cacheable then bypass varnish for 2 minutes as Hit-For-Pass
   if (beresp.ttl <= 0s ||
       beresp.http.Surrogate-control ~ "no-store" ||
       (!beresp.http.Surrogate-Control &&
       beresp.http.Cache-Control ~ "no-cache|no-store") ||
       beresp.http.Vary == "*") {
        # Mark as Hit-For-Pass for the next 2 minutes
        set beresp.ttl = 120s;
        set beresp.uncacheable = true;
    }
return (deliver);
}
sub vcl_deliver {
    if (resp.http.X-Magento-Debug) {
        if (resp.http.x-varnish ~ " ") {
            set resp.http.X-Magento-Cache-Debug = "HIT";
            set resp.http.Grace = req.http.grace;
        } else {
            set resp.http.X-Magento-Cache-Debug = "MISS";
        }
    } else {
        unset resp.http.Age;
    }
    # Not letting browser to cache non-static files.
    if (resp.http.Cache-Control !~ "private" && req.url !~ "^/(pub/)?(media|static)/") {
        set resp.http.Pragma = "no-cache";
        set resp.http.Expires = "-1";
        set resp.http.Cache-Control = "no-store, no-cache, must-revalidate, max-age=0";
    }
    unset resp.http.X-Magento-Debug;
    unset resp.http.X-Magento-Tags;
    unset resp.http.X-Powered-By;
    unset resp.http.Server;
    unset resp.http.X-Varnish;
    unset resp.http.Via;
    unset resp.http.Link;
}
sub vcl_hit {
    if (obj.ttl >= 0s) {
        # Hit within TTL period
        return (deliver);
    }
    if (std.healthy(req.backend_hint)) {
        if (obj.ttl + 300s > 0s) {
            # Hit after TTL expiration, but within grace period
            set req.http.grace = "normal (healthy server)";
            return (deliver);
        } else {
            # Hit after TTL and grace expiration
            return (restart);
        }
    } else {
        # server is not healthy, retrieve from cache
        set req.http.grace = "unlimited (unhealthy server)";
        return (deliver);
    }
}
After we pasted the text, we need to create a new file in the same location (/etc/varnish)
sudo nano hit-miss.vcl
Paste the bellow data in the file and save it.
File hit-miss.vcl:
sub vcl_recv {
        unset req.http.x-cache;
}
sub vcl_hit {
        set req.http.x-cache = "hit";
}
sub vcl_miss {
        set req.http.x-cache = "miss";
}
sub vcl_pass {
        set req.http.x-cache = "pass";
}
sub vcl_pipe {
        set req.http.x-cache = "pipe uncacheable";
}
sub vcl_synth {
        set resp.http.x-cache = "synth synth";
}
sub vcl_deliver {
        if (obj.uncacheable) {
                set req.http.x-cache = req.http.x-cache + " uncacheable" ;
        } else {
                set req.http.x-cache = req.http.x-cache + " cached" ;
        }
        # uncomment the following line to show the information in the response
        set resp.http.x-cache = req.http.x-cache;
}
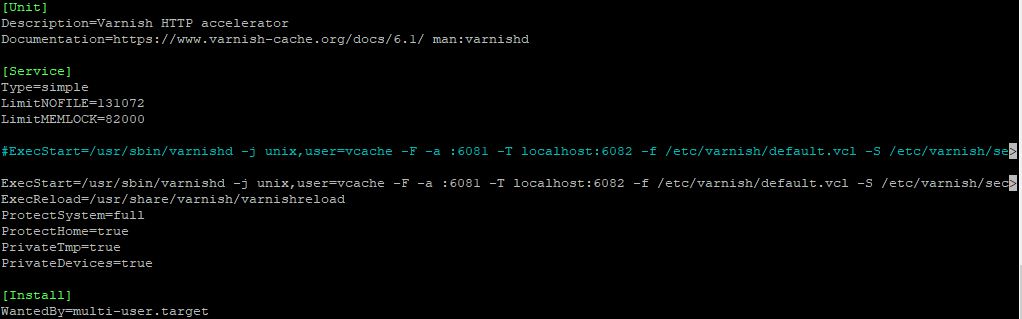
We will now set up the varnish.service by editing the file. We will be putting 2 versions – running Varnish with RAM or running with a file on disk – uncomment the “ExecStart” that you want to use for your system.
sudo nano /etc/systemd/system/varnish.service
[Unit]
Description=Varnish HTTP accelerator
Documentation=https://www.varnish-cache.org/docs/6.1/ man:varnishd
[Service]
Type=simple
LimitNOFILE=131072
LimitMEMLOCK=82000
#ExecStart=/usr/sbin/varnishd -j unix,user=vcache -F -a :6081 -T localhost:6082 -f /etc/varnish/default.vcl -S /etc/varnish/secret -p workspace_backend=262144 -p http_resp_size=196608 -p http_resp_hdr_len=131072 -p workspace_client=131072 -p http_req_size=65536 -p http_req_hdr_len=32768 -s malloc,8G
<p>ExecStart=/usr/sbin/varnishd -j unix,user=vcache -F -a :6081 -T localhost:6082 -f /etc/varnish/default.vcl -S /etc/varnish/secret -p workspace_backend=262144 -p http_resp_size=196608 -p http_resp_hdr_len=131072 -p workspace_client=131072 -p http_req_size=65536 -p http_req_hdr_len=32768 -s file,/var/lib/varnish/varnish_storage.bin,120G
ExecReload=/usr/share/varnish/varnishreload
ProtectSystem=full
ProtectHome=true
PrivateTmp=true
PrivateDevices=true
[Install]
WantedBy=multi-user.target
At this point we need to change again the sites-available configuration file for NGINX in order to make everything to work correctly:
sudo nano /etc/nginx/sites-available/magento2test
You need to edit the file so it looks like the code below, of course you need to use your own domain name and installation location:
The file magento2test:
upstream fastcgi_backend {
server  unix:/run/php/php7.4-fpm.sock;
keepalive 30;
}
server {
listen 80;
server_name coffee-mail.eu;
return 301 https://$server_name$request_uri;
ssl_certificate /etc/letsencrypt/live/coffee-mail.eu/fullchain.pem;
ssl_certificate_key /etc/letsencrypt/live/coffee-mail.eu/privkey.pem;
ssl_trusted_certificate /etc/letsencrypt/live/coffee-mail.eu/chain.pem;
ssl_dhparam /etc/ssl/certs/dhparam.pem;
if ($host = coffee-mail.eu) {
        return 301 https://$host$request_uri;
    } # managed by Certbot
}
proxy_cache_path /tmp/cache keys_zone=cache:50m levels=1:2 inactive=600s max_size=300m;
server {
listen 443 ssl http2;
server_name coffee-mail.eu;
# Enable Gzip
gzip  on;
gzip_http_version 1.0;
gzip_comp_level 2;
gzip_min_length 1100;
gzip_buffers     4 8k;
gzip_proxied any;
gzip_types
# text/html is always compressed by HttpGzipModule
text/css
text/javascript
text/xml
text/plain
text/x-component
application/javascript
application/json
application/xml
application/rss+xml
application/x-javascript
font/truetype
font/opentype
application/vnd.ms-fontobject
image/svg+xml svg svgz
gzip_static on;
gzip_proxied        expired no-cache no-store private auth;
gzip_disable        "MSIE [1-6]\.";
gzip_vary           on;
ssl_certificate /etc/letsencrypt/live/coffee-mail.eu/fullchain.pem; # managed by Certbot
ssl_certificate_key /etc/letsencrypt/live/coffee-mail.eu/privkey.pem; # managed by Certbot
ssl_trusted_certificate /etc/letsencrypt/live/coffee-mail.eu/chain.pem;
ssl_dhparam /etc/ssl/certs/dhparam.pem;
ssl_session_timeout 1d;
ssl_session_cache shared:SSL:50m;
ssl_session_tickets off;
ssl_protocols TLSv1 TLSv1.1 TLSv1.2 TLSv1.3;
fastcgi_connect_timeout 60s;
fastcgi_next_upstream_timeout 40s;
fastcgi_next_upstream_tries 10;
fastcgi_read_timeout 60s;
fastcgi_send_timeout 60s;
fastcgi_cache_lock_timeout 60s;
fastcgi_buffers 4 256k;
fastcgi_buffer_size 128k;
client_body_buffer_size 128k;
client_header_buffer_size 128k;
client_max_body_size 512m;
large_client_header_buffers 4 128k;
ssl_ciphers 'ECDHE-ECDSA-CHACHA20-POLY1305:ECDHE-RSA-CHACHA20-POLY1305:ECDHE-ECDSA-AES128-GCM-SHA256:ECDHE-RSA-AES128-GCM-SHA256:ECDHE-ECDSA-AES256-GCM-SHA384:ECDHE-RSA-AES256-GCM-SHA384:DHE-RSA-AES128-GCM-SHA256:DHE-RSA-AES256-GCM-SHA384:ECDHE-ECDSA-AES128-SHA256:ECDHE-RSA-AES128-SHA256:ECDHE-ECDSA-AES128-SHA:ECDHE-RSA-AES256-SHA384:ECDHE-RSA-AES128-SHA:ECDHE-ECDSA-AES256-SHA384:ECDHE-ECDSA-AES256-SHA:ECDHE-RSA-AES256-SHA:DHE-RSA-AES128-SHA256:DHE-RSA-AES128-SHA:DHE-RSA-AES256-SHA256:DHE-RSA-AES256-SHA:ECDHE-ECDSA-DES-CBC3-SHA:ECDHE-RSA-DES-CBC3-SHA:EDH-RSA-DES-CBC3-SHA:AES128-GCM-SHA256:AES256-GCM-SHA384:AES128-SHA256:AES256-SHA256:AES128-SHA:AES256-SHA:DES-CBC3-SHA:!DSS';
ssl_prefer_server_ciphers on;
ssl_stapling on;
ssl_stapling_verify on;
resolver 8.8.8.8 8.8.4.4 valid=300s;
resolver_timeout 30s;
keepalive_timeout 300s;
proxy_cache cache;
proxy_cache_lock on;
proxy_cache_valid 200 1s;
proxy_cache_use_stale updating;
location / {
proxy_pass http://localhost:6081;
proxy_set_header Host $http_host;
proxy_set_header X-Forwarded-Host $http_host;
proxy_set_header X-Real-IP $remote_addr;
proxy_set_header X-Forwarded-For $proxy_add_x_forwarded_for;
proxy_set_header Ssl-Offloaded “1”;
proxy_set_header X-Forwarded-Proto $scheme;
proxy_set_header X-Forwarded-Proto $http_x_forwarded_proto;
proxy_set_header X-Forwarded-Port 443;
proxy_headers_hash_max_size 1024;
proxy_headers_hash_bucket_size 1024;
proxy_buffering on;
proxy_buffer_size 128k;
proxy_buffers 4 256k;
proxy_busy_buffers_size 256k;
proxy_read_timeout 360;
proxy_http_version 1.1;
proxy_set_header Connection "";
proxy_set_header Accept-Encoding "";
#proxy_redirect http://localhost:6081 https://coffee-mail.eu;
#proxy_hide_header X-Varnish;
#proxy_hide_header Via;
#proxy_buffering off;
}
location ~ "\.php$" {
                fastcgi_index index.php;
                if (!-f $realpath_root$fastcgi_script_name) {
                                return 404;
                }
                include /etc/nginx/fastcgi_params;
                fastcgi_pass unix:/var/run/php/php-fpm7.4.sock;
                access_log /var/log/nginx/phpfpmonly-access.log;
}
}
server {
listen 8080;
#add_header Strict-Transport-Security “max-age=15768000; includeSubDomains; preload;”;
add_header Strict-Transport-Security "max-age=31536000; includeSubDomains" always;
add_header X-Frame-Options SAMEORIGIN;
add_header X-Content-Type-Options nosniff;
include snippets/letsencrypt.conf;
ssl_certificate /etc/letsencrypt/live/coffee-mail.eu/fullchain.pem;
ssl_certificate_key /etc/letsencrypt/live/coffee-mail.eu/privkey.pem;
ssl_trusted_certificate /etc/letsencrypt/live/coffee-mail.eu/chain.pem;
ssl_dhparam /etc/ssl/certs/dhparam.pem;
set $MAGE_ROOT /var/www/magento2test;
set $MAGE_MODE developer;
include /var/www/magento2test/nginx.conf.sample;
}
Save the file and restart the NGINX and Varnish services:
sudo service varnish restart
sudo service nginx restart
Now if we visit the website with Chrome, we can check if Varnish caches the site correctly.
Lets start by visiting the domain coffee-mail.eu in Chrome. After the loadout, press F12 to enter the viewing mode.
We need to switch to “Network” and then reload the website with F5. You can see in the image bellow that the website starts loading after few ms, which is a good result.
Conclusion:
We have successfully set up a new Ubuntu 20 system that serves us as a NGINX webserver, with MariaDB, SSL certificate and Varnish as a caching system. There are many more things that can be done in order to improve the speed and reliability of the system, but with this tutorial a nice foundation is made.
You can find more of Ubuntu tutorials on the link: https://wtp-web.com/blog/
If you have any suggestions on how to improve this article we are always happy to receive your feedback on our e-mail [email protected]. Thank you for reading and happy computing!
Adrian
Hi, nice tutorial, really helping me out, however I am receiving an error when installing the ssl
Can’t open /etc/nginx/ssl/dhparam.pem for writing, No such file or directory
139729329448256:error:02001002:system library:fopen:No such file or directory:../crypto/bio/bss_file.c:69:fopen(‘/etc/nginx/ssl/dhparam.pem’,’w’)
139729329448256:error:2006D080:BIO routines:BIO_new_file:no such file:../crypto/bio/bss_file.c:76:
How to fix this would be appreciated
Miran
try adding sudo in front of the code
Shawn
Same issue after perfect install (great guide) but this is the error after adding Varnish. The system won’t let me restart Nginx due to this error.
Also Composer pulls ver 1 from the Ubuntu repo, so the guide should update the install to use ver 2 which Magento 2.4+ requires.
Thanks for the guide, and looking forward to the updates.
Miran
send me a screen shot on my mail [email protected]; cant see exactly what the error on varnish is
shawn
Fixed the error:
Goto /etc/nginx/sites-enabled/(your magento file) and comment out every line that has #ssl_dhparam /etc/ssl/certs/dhparam.pem; and replace it with:
ssl_dhparam /etc/nginx/ssl/dhparam.pem;
then restart nginx and restart varnish.