
Introduction: In the vast realm of Windows operating system, there are numerous features and settings that often go unnoticed or overlooked. One such hidden gem lies within the Windows Settings, specifically within the Typing section. Today, we bring to light a lesser-known setting that can significantly enhance your typing experience. Join us as we delve into the realm of Input Language Hot Keys, a feature that can be found by navigating through Windows Settings. This blog post aims to guide you step-by-step through the process of accessing and configuring this hidden keyboard setting to customize your Windows experience.
Step 1: Opening Windows Settings To begin, click on the Windows Start button, usually found in the bottom-left corner of your screen. From the Start menu, locate and click on the gear-shaped icon, which represents the Windows Settings. Alternatively, you can press the Windows key + I on your keyboard as a shortcut to open Windows Settings directly.
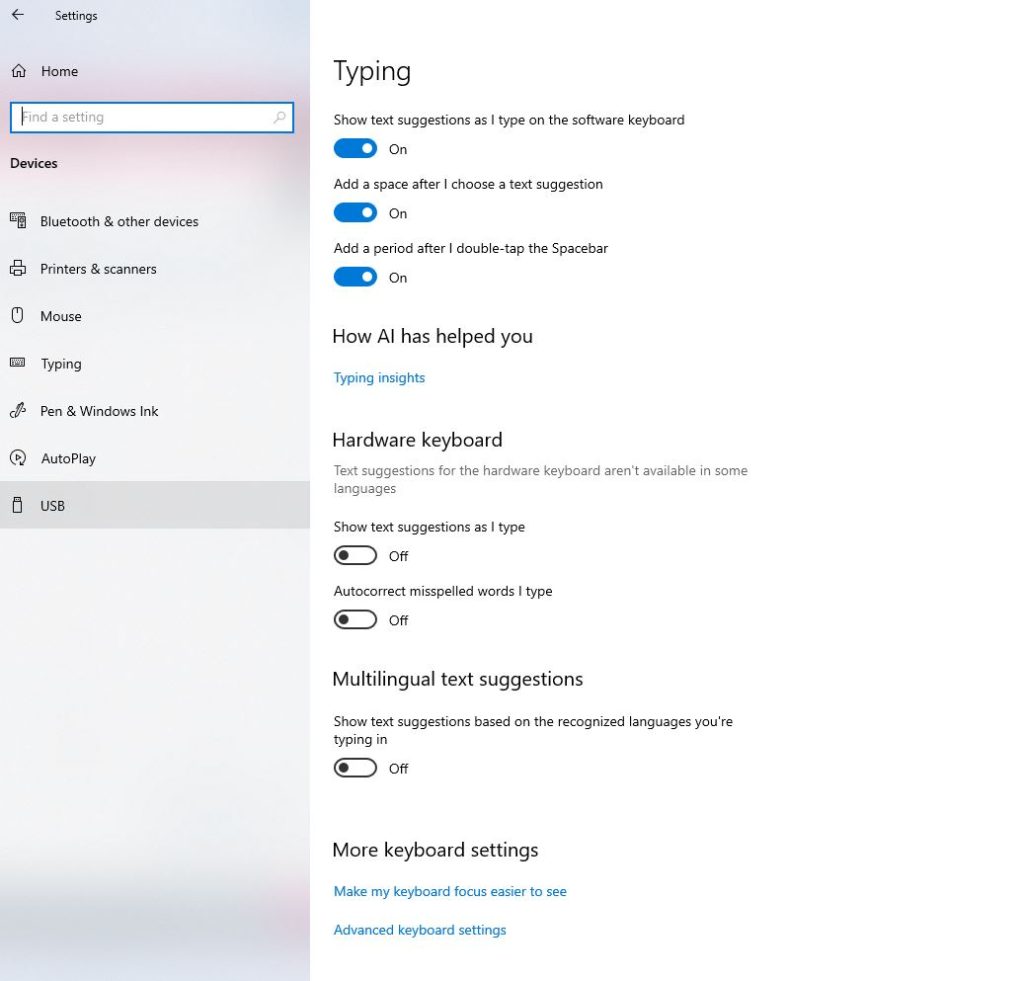
Step 2: Accessing the Typing Section Within the Windows Settings, you’ll find various categories of settings. Look for the “Devices” category and click on it to expand its options. Within the Devices section, you’ll find “Typing” listed as one of the available options. Click on “Typing” to proceed.
Step 3: Exploring Advanced Keyboard Settings Under the Typing section, you’ll find an array of keyboard-related options. Scroll down until you see “Advanced Keyboard Settings” and click on it. This will take you to a new window where you can configure advanced keyboard settings.
Step 4: Navigating to Input Language Hot Keys Once you’re in the Advanced Keyboard Settings window, locate and click on the “Input Language Hot Keys” option. This is where you can customize the keyboard shortcuts associated with input language switching.
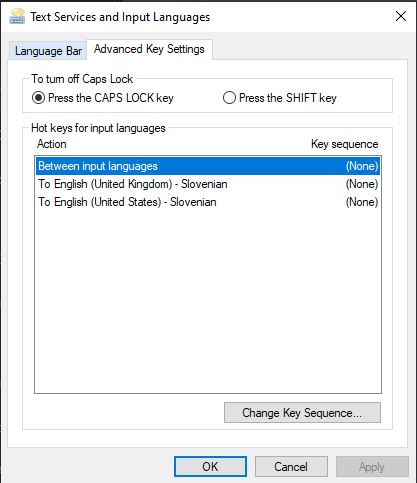
Step 5: Modifying Key Sequence Within the Input Language Hot Keys window, you’ll see a list of available key sequences and their associated functions. To change the key sequence for a particular function, click on the function you wish to modify and then click on the “Change Key Sequence” button.
Step 6: Assigning Key Sequences After clicking on “Change Key Sequence,” a new window will open, allowing you to set a key sequence for the selected function. By default, each function has a preassigned key sequence. To set a function to “Not Assigned,” simply select the function and choose the “Not Assigned” option from the drop-down menu. This will effectively remove any assigned key sequence for that function.
Step 7: Applying Changes Once you’ve made the desired changes to the key sequences, click on the “OK” button to save your modifications and exit the window. You can repeat the process for other functions if you wish to customize their key sequences as well.

Conclusion: Unveiling hidden features within an operating system can be a gratifying experience, as it allows users to tailor their computing environment to their specific needs. In this blog post, we’ve explored the lesser-known Input Language Hot Keys feature found within Windows Settings. By following the step-by-step guide provided, you can now access and modify the key sequences associated with input language switching on your Windows device. Enjoy a personalized and streamlined typing experience by assigning key sequences that align with your preferences. Unlock the full potential of your Windows operating system by discovering and utilizing its hidden features.